Hey there, fellow tech enthusiasts! Have you ever dreamed of hosting your own Linux server in the cloud but felt overwhelmed by the technical jargon?
Fear not! This guide is tailored just for you, the home tech-savvy user. We’ll walk through setting up a Linux server on DigitalOcean, a popular cloud service provider. So, grab a cup of your favorite beverage, and let’s embark on this geeky adventure together!
Step 1: Sign Up for DigitalOcean
First things first, you need an account with DigitalOcean. It’s straightforward – just visit their website and sign up.
Once you’ve signed up, set up your billing information. DigitalOcean offers various payment options, including credit cards and PayPal.
Step 2: Create a Droplet
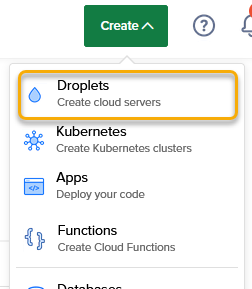
In DigitalOcean lingo, a server is called a “Droplet.” To create one, click on the “Create” button and choose Droplet from the drop-down menu.


Step 3: Choose Your Server’s Configuration
Here’s where the fun begins! Choose your server size, data center region, and most importantly, your Linux distribution.
As a begginer your can go with the basic server size of 1GB of RAM and 1 CPU, but it would be best if you take the 2GB of RAM at least.
When it comes to choose your data center region, it will be best choose the one that is nearest to you geographically.
For most common uses you can choose the latest version of Ubuntu LTS (long time support)
Step 4: Set Up SSH Keys for Security
For security, I can recommend you not to use password for login and set up SSH keys for your server. This involves generating a key pair on your local machine and adding the public key to your DigitalOcean account.
You can follow DigitalOcean instruction on how to setup a key pair on your machine if you are using Mac or Linux, and if you are using Windows you can install puttygen from here or use WPOven free online tool.
Step 5: Deploy Your Droplet
With everything set, click the “Create Droplet” button again, and DigitalOcean will start setting up your server.
Once your server will be ready, you will see our new server IP address in digital ocean dashboard.
Step 6: Access Your Linux Server
Once your Droplet is ready, access it using SSH from your local computer.
If you are on Mac or Linux you can open your terminal, and type in the SSH command provided by DigitalOcean.
If you are using Windows I would recommend using an SSH client such as Putty or MobaXterm.
Step 8: Update and Upgrade Your Server
After logging in, the first thing that I would recommend you do is to update and upgrade your server.
Run the following command:
sudo apt
sudo apt upgrade
Congratulations! You’ve set up your very own Linux server in the cloud. Now, the digital world is your oyster. Explore, experiment, and most importantly, have fun!


